
3 times a year, I offer free camera classes to the community. I love doing it and love getting to know my students and seeing their excitement to learn more about their cameras. Most of my students are moms wanting to take better pictures of their kids or High School Students that work for the yearbook staff at school. Understanding how your camera works can open up a world of possibilities in getting your images to look the way you want. Below are the Top 10 Questions that I get asked (and we discuss) during my camera classes and hopefully will help you understand a little more about your own camera.
1- What is the difference between a full frame and a crop sensor camera? The most visible difference between full frame and crop sensor camera is their field of view. In fact the term “crop” implies just exactly that. The crop sensor camera has a smaller sensor and therefore you will have less field of view than with a full frame camera. In other words if you take a picture with a full frame camera and then the exact same picture with a crop sensor camera, you will see less of the image in a crop sensor camera. See the example below- the first picture was taken with my crop sensor camera using the exact same lens and having me stand in the exact same place as the second image taken with my full frame camera. See the difference? Make sense now?
There are certain pros and cons when choosing one of these cameras over the other. A crop sensor and its lenses will be less expensive while still providing great quality. It’s ability to shoot in low light is more challenging than a full frame and since it crops in closer to your subject, may work better in situations where you need a tighter zoom, like sports photography. A full frame and its lenses are more expensive but perform much better in lower light levels and are suited for situations where you may shoot wider angles such as landscape photography or large groups of people.
Crop Sensor Camera, 50mm lens:
.jpg)
Full Frame Camera, 50 mm lens:
.jpg)
2- What is aperture, shutter speed, and ISO?
There are 3 components (also known as the exposure triangle) that work together for a perfectly exposed image- Shutter Speed, Aperture, and ISO. The 3 work together in tandem and control the look, feel, and exposure of every image you take. There is a lot to know about how these settings work together to get the image you want, but for now, we are just going to stick with the basics and define each of them. Just make sure you are aware that your camera has to be in manual mode in order to adjust these settings manually in your camera.
Shutter Speed: Shutter speed is exactly that- how fast the shutter opens and closes in your camera. The faster the shutter speed (1000 for example), the less light that it allows into your camera. The slower the shutter speed (100 for example), the more light that it allows in your camera. So understanding that concept, it makes sense that typically you would use a slower shutter speed in lower light settings (allowing the most time to pull light into your camera) and a faster shutter speed in higher light settings, like outside on a bright and sunny day.
Aperture (F-stop): Aperture is how large the diaphragm (or simply, the hole) in your camera opens. The larger the opening (f1.4 for example), the more light that flows into your camera, the smaller the opening (f5.6 for example), the less light. Think of aperture like the pupil in your eye. When you walk outside on a bright sunny day, your pupils get small, decreasing the amount of light entering your eye. When you go into a dark room, your pupils dilate, allowing much more light so you can see. Aperture works under these same principles.
ISO: ISO is the sensitivity setting on your camera. It tells your camera how much light to absorb when the shutter in your camera opens. If you set your camera to a low ISO setting (200 for example), it will absorb less light. If you set your ISO higher (1000+) you are telling your camera to absorb more light. As a general rule, in a darker room, you would want to set your ISO higher than outside in good light.
As I stated above, each of these settings control the look and feel of your image along with the exposure. Each have pros and cons in different light levels and situations. Understanding all these components and learning what settings work best in different situations takes time and practice, but don’t get discouraged. Keep practicing, practicing, and then practice some more and it will start to make sense.
3- What is white balance? While our brains automatically process the colors we see, digital cameras can only guess what the color temperature is by reading ambient light. In most cases, digital cameras can guess pretty well, however, in some situations they make errors. Because of these errors, some of the pictures might appear to be bluish or yellowish in color and the skin tones might not look natural. Your camera has several auto settings that you can use to adjust your white balance. In the example below, the first picture is set to Auto White Balance while the second is set to the “cloudy” setting so you can see a side by side example of how the camera makes changes based off the light it is reading. Neither are color corrected so you can see what it looks like live out of the camera.
Auto – this is where the camera makes a best guess on a shot by shot basis. You’ll find it works in many situations but it’s worth venturing out of it for trickier lighting.
Tungsten – this mode is usually symbolized with a little bulb and is for shooting indoors, especially under tungsten (incandescent) lighting (such as bulb lighting). It generally cools down the colors in photos.
Fluorescent – this compensates for the ‘cool’ light of fluorescent light and will warm up your shots.
Daylight/Sunny – not all cameras have this setting because it sets things as fairly ‘normal’ white balance settings.
Cloudy – this setting generally warms things up a touch more than ‘daylight’ mode.
Flash – the flash of a camera can be quite a cool light so in Flash WB mode you’ll find it warms up your shots a touch.
Shade – the light in shade is generally cooler (bluer) than shooting in direct sunlight so this mode will warm things up a little.
Auto White Balance Example:
.jpg)
Cloudy White Balance Setting:
.jpg)
4- What is the difference between “auto” and “manual” settings on my camera? In auto mode, the camera will determine the settings outlined above (shutter, aperture, and ISO) based on the best information that it has- lighting typically being the main factor. When you set your camera in manual mode, you are in control of the settings on your camera and can manage the look and feel of your images without the camera’s interference. Below is a short definition of the different options to set your camera.
Auto or “P”: Camera is in auto mode and will make decisions on the ISO, Aperture and Shutter settings on your camera based off the light and subject that it reads.
“S”= Shutter Priority: You can manually adjust the shutter and the camera will automatically adjust the aperture and ISO in your camera for the image you are taking.
“A”= Aperture Priority: You can manually adjust the aperture and the cameral will automatically adjust the shutter and ISO in your camera for the image you are taking.
“M”= Manual: You are in control of all setting on your camera- Shutter, Aperture, and ISO.
5- What is Depth of Field (DOF)? Depth of field is simply the distance between the nearest and the furthest objects in an image that are sharp and in focus. The aperture setting on your camera manages DOF. The lower the number (f1.4) the narrower the depth of field. The higher the number (f5.6+), the more distance between the nearest and farthest objects that will be in focus in your image. So what does this mean? Well if you are taking a landscape photo and want all the beautiful scenery in focus, then your aperture should be at a high number (f7.1+). If you are taking a detail photo of a flower and you want the flower in focus and what’s behind the flower soft and blurry, then your aperture should be a low number (f2.0). Remember, the lens on your camera manages aperture. So if you are struggling and want that soft blur with a low aperture number and your lens won’t do it, then you will have to look at purchasing a different lens (not camera). Remember, your camera has to be in manual mode in order to adjust aperture, otherwise your camera will make the decision for you.
The examples below are a good way of showing you what depth of field looks like. The first image is shot with a very narrow DOF (f1.4). You can see how soft the image is and that the items behind the ornament are blurred in the background. The foxes eyes are in focus but looking at the train behind, it is soft and out of focus, drawing your eye more to the fox that is in focus. The second image is shot with a much deeper DOF (f7.1). You can see how much crisper and in focus the image looks compared to the top picture. Your eye looks all around the image since all the ornaments appear crisp. Aperture is an amazing setting when it comes to controlling the look and feel of your images. I recommend you experiment with it to see how you can manage the way your images look.
.jpg)
.jpg)
6- What is a “kit” lens? What is the difference between a kit lens and other lenses? A kit lens is just that- a lens that you buy as part of a package deal with the body of a new camera. Kit lenses are made to give hobbyist photographers options, but they are very limited in what they can do in managing the look and feel of your images. Determining what you want to take pictures of and how you want those images to look can help determine what type of lens you should invest in. Prime lenses (lenses that don’t zoom, they stay fixed and stationary) are great for portraits because they typically can be set at low apertures which provides a softer image. Sports photographers would want a zoom lens to allow them to get closer to the action. Be cautioned when buying a new camera in a package deal with kit lenses. While they may be a good start, they won’t be a purchase that is worth the investment long term. It would be a better investment to purchase a camera body, then buy the lenses separately based on what is best for the images you want to take.
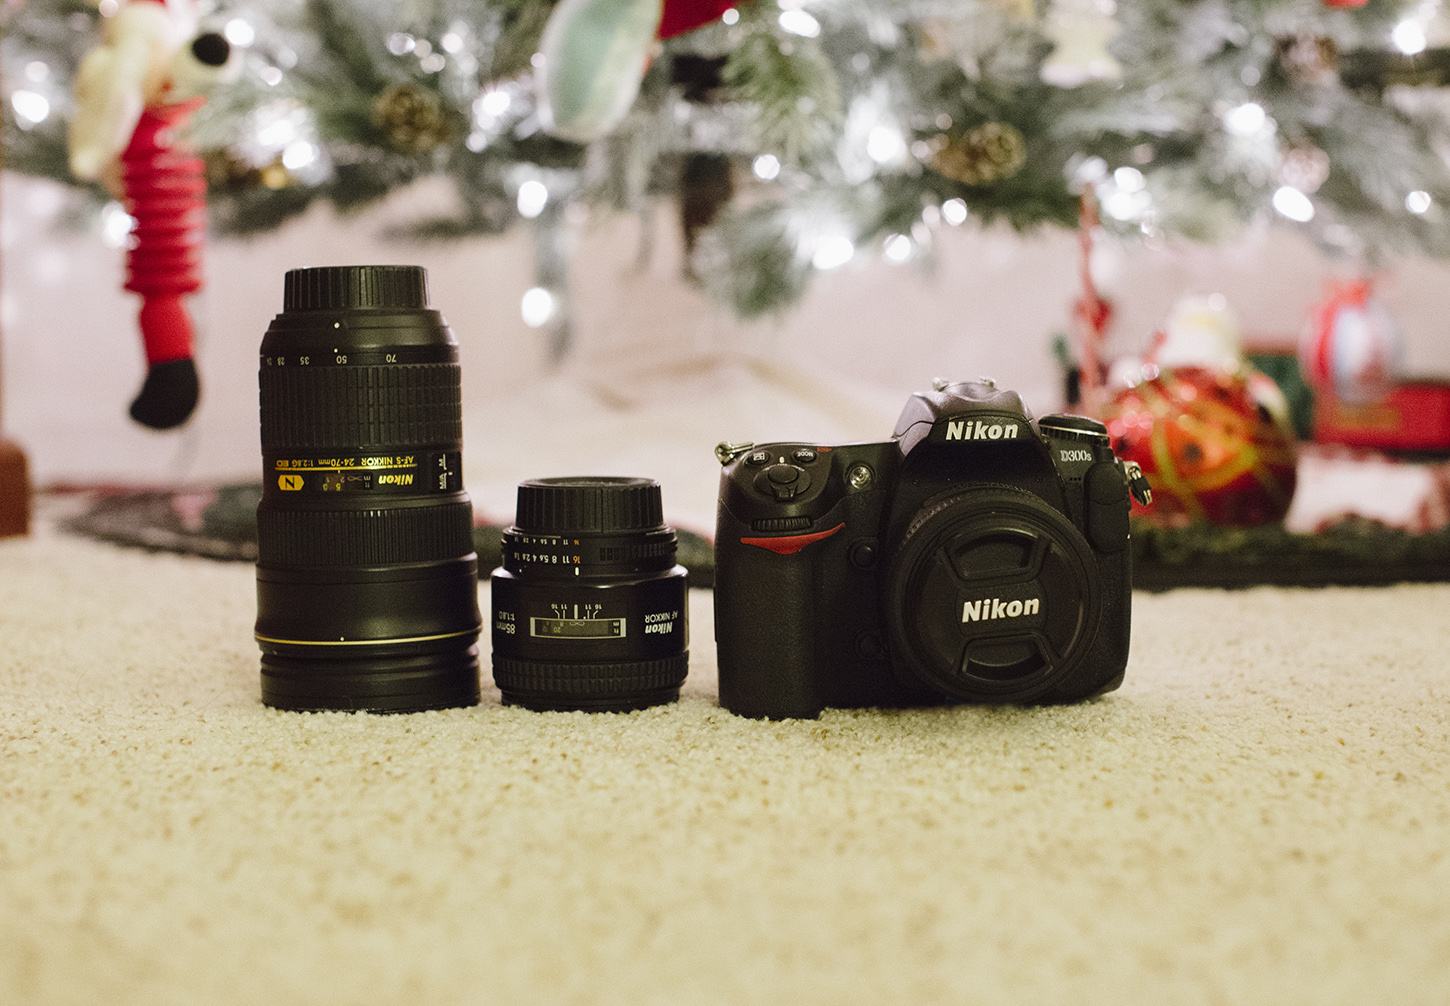
7- What does it mean when I look at my lens and it says 70-200mm? There are a variety of lenses out there all made to give you the image look and feel that you desire. The millimeters on your lens (in this example 70-200mm) simply means the range or zoom that you will get with that particular lens. The best way to think of this is to know that your eye sees at about 50mm. So if you are standing in front of a person, the distance between you and that person as your eye sees it, is about 50mm (by camera standards). Any number higher than 50 will pull your subject closer to you (zoom in) and any number lower than 50 will push your subject further away (wide angle). So in my example, a 70-200mm lens will zoom in closer than your eye sees (since your eye sees at 50mm and this lens starts at 70mm) and bring your subject 4x closer when you zoom the lens to 200mm. Make sense? So let’s try another example- if you have a 50mm lens, then that lens will keep your subject at the same distance your eye sees it and has no zoom or range. It is stationary and will only shoot at 50mm. If you want to zoom with this lens, than you physically walk closer to your subject or back up further away from your subject.
The picture below shows 2 lenses that are always in my camera bag. The one on the left is an 85mm f1.8, which means that this lens only shoots at 85mm (so closer than your eye sees at 50mm) and the lowest aperture this lens will perform at is a f1.8- which is a pretty wide aperture with a very narrow depth of field (this making any sense yet?). Now this lens will go much higher that a f1.8, but the lowest aperture is f1.8. The one on the right is my favorite zoom lens and is a 24-70mm f2.8. So this lens has a room range of 24mm (wider angle) to 70mm (slight zoom) and the lowest aperture is a f2.8. The picture is taken with my 50mm f1.4 and is my favorite lens that hardly ever comes off my camera.
.jpg)
8- Why are my pictures blurry? I get this question a lot. Especially when my students are taking pictures of their young children that constantly move. Above I explained that when your camera is set to auto, it will make decisions on aperture, shutter speed, and ISO. In low light settings, your camera will automatically slow down your shutter speed, keeping the shutter open longer to allow in more light. When the shutter of your camera slows down, it will record any movement that occurs while the shutter in your camera is open. So, if you are taking pictures in low light and your 4 year old is bouncing in front of your camera as you take your pictures, then the slow shutter will record all the movement and you will get a blurry image. To correct this, if you place your camera in manual mode, you can compensate for the low light levels with a higher ISO so your cameras sensitivity to light is higher and absorbs more light without getting the blur.
9- What is the best portrait lens? Most of my students are moms that want to take better pictures of their children and families, so I get asked about portrait lenses quite frequently. This question will range based on who you ask, but my favorite portrait lens is a 50mm f1.4 prime lens. Now remember, 50mm refers to the range or zoom of the lens, so now that you know your eye sees at 50mm, this lens takes pictures at about the same distance as my natural eye sees. With a prime lens there is no zoom- it is stationary at 50mm, so if I want to bring my subject closer in, then I simply walk closer to my subject or back up further away if needed (my legs are the zoom). Now you also know that the f1.4 refers to the aperture of the lens (how wide the hole in the lens will open). The lower the number, the larger the hole in the lens will open (I know, backwards to what you would logically think). So a f1.4 is a very wide aperture and will have a very thin depth of field (distance between the nearest and furthest objects in an image that are in focus). I do not shoot my portraits at f1.4, I typically shoot portraits around a f2.0 so I can get the features of my subjects face in focus. Purchasing a prime lens will give you lots of options when shooting portraits. I recommend renting one and playing around with it to see if it fits your needs.
10- What’s the difference between Canon and Nikon and which camera is better? This question can only be answered by the needs of the person purchasing a new camera. Canon and Nikon are the top camera models sold in the United States. Both provide excellent quality photos and are amazing cameras. Generally speaking, Canon cameras shoot warmer (more yellow) than Nikon cameras which shoot cooler (more blue). So depending on the look of the images you want to get, that may help you in your decision. Canon camera bodies are typically more expensive than Nikon camera bodies, but Canon’s lenses are usually less expensive- Nikon having some of the most expensive lenses in the world. The biggest difference between the two is the way the photographer uses the camera, meaning how the controls are laid out and how easy it is to find the settings. Depending on personal preference and what makes sense to you, one model may be a better fit than another. Generally speaking, I have been told that Canon is more user friendly, but I find that most photographers stick with what they know. So if a photographer started on Nikon and learned on one, then they stick with that equipment and vice versa. I shoot with a Nikon camera. I have 2 of them. I love my Nikon equipment and have no desire to move to Canon. I simply started with a Nikon camera 15 years ago and that is really the only reason that I still shoot using a Nikon today. Try both out and see what fits your needs best. Once you start to invest, you will want to stick with the same brand since lenses, flashes, and other equipment are incompatible if you decide to change your camera to a different brand.
So, Wow, if you are still reading this than you really like your camera and want to learn more about using it. Bravo! It’s a lot of information and can be really confusing. The one piece of advice that I can give you to get better using your camera is to practice. Practice on anyone or anything that will let you take pictures and go, go, go! Ask for help if you need it and keep using it. I promise, the more you use your camera, the more natural and easier it will become. Good luck with your journey and let me know how I can help! Have a great day and thanks for reading! I hope this has helped (even if just a little!)